
Playing Catch - Throwing The Baseball
Entire Body
When kids are taught to throw, often the instruction is watered down into just a couple of steps. The act of throwing a baseball is not that simple. Throwing requires the entire body to work together in order to throw the ball accurately and to put something on it. All positions on the field require the ability to throw the ball accurately. Good throwing mechanics will enable you to make plays. When you warm up with the team before practice or play catch in the back yard, make sure you work on your mechanics and strive to improve your accuracy.
Grip
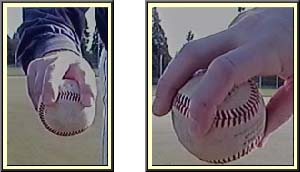
The best way to grip the ball is across the seams as pictured to the right. The fingers are placed over the top of the seams to provide a good grip on the ball. In the first picture you'll notice that you can see 2 seams running horizontally. The back of the ball not visible will also have 2 seams running horizontally. By gripping the ball in this fashion, those 4 seams will help to keep the ball in the air longer and keep the ball traveling straighter (assuming the player can throw it with 12-6 rotation - see graphic belo).
It takes years of practice to be able to grip the ball across the 4 seams in this fashion when playing a position other than pitcher on the field. Players can work on this by throwing the ball into their glove and as they pull the ball out shift the ball to the correct grip. This takes practice and I wouldn't worry about it for younger players.
Try to keep the ball out on the fingertips not back in your hand. The second picture on the right shows the ball out on the fingertips. Gripping the ball in the palm of your hand and not out on your fingers will cost you velocity and accuracy. Younger players may need to grip the ball with three fingers instead of two, but unless their hands are very small they should still try to grip the ball out on the fingers.
Wrist
Many young players don't use their wrist much when throwing the ball. When the ball is brought back in the throwing motion, the wrist should be cocked back. This way the wrist can be used as part of the throwing motion.
Watch young players throw and you will see most will throw with a stiff wrist. It is very difficult to throw the ball accurately with a stiff throwing wrist. This is a skill that young players should work on from the start.
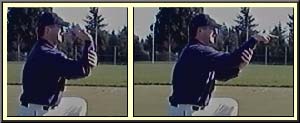
You can practice this skill by holding your throwing arm just above the wrist with your glove hand (see image to the left). Bend your throwing arm at the elbow with your forearm vertical. Keeping your arm in this position, practice throwing the ball with just your wrist and fingers. It may feel strange at first, but keep working on this skill. The wrist and fingers play a major role in the accuracy and strength of your throw.
You can find more throwing drills in the drills section.
Arm Motion
You can think of the motion your arm makes when throwing the ball as a circular motion. If you're throwing a short distance, the circular motion will be smaller then when you are throwing farther, but it's still a circular motion. The circular motion will aid your throw by providing more natural momentum than simply bringing your arm straight back and then forward. The circular motion should begin when you're pulling the ball from your glove. If you are playing outfield you will almost always be making a longer throw, so when you remove the ball from your glove, your arm and hand should drop down and by your back knee. This will provide you with the longest circular motion possible. If you are making a shorter throw in the infield for example, you may take the ball out of your glove and move it back and down slightly. This will give you a circular motion appropriate for the distance.
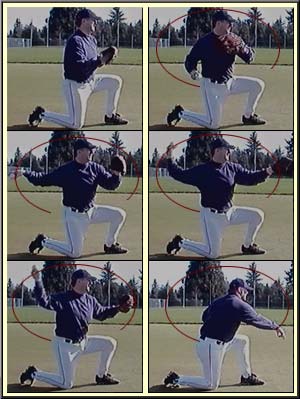
It's important to have your hand on top of the ball as you pull it back and start your throwing motion.
How do you determine if you're throwing with a circular motion or not? One of the best ways to check yourself is to freeze occasionally after you pull the ball out of your glove. If you are bring it up and back for anything other than a very short throw, you are not using a good circular motion in your throw.
If you have been throwing incorrectly for a long time, then it is going to feel different throwing with a good circular motion. That is to be expected. Practice throwing this way all the time and it will soon feel natural and you should see increased accuracy and velocity.
Front Shoulder
When throwing you want your front shoulder to point in the direction of where you are throwing. So after fielding the ball you will be turning your body sideways and pointing your lead shoulder in the direction of the throw.
Lower Body
If you follow the logic of having your front shoulder facing the target then you might have guessed that you also want your lower body lined up in the same manner. Your back foot should be perpendicular to the target and your hips should be closed and also pointing in the direction of the target.
Once you have everything lined up, you'll want to step toward the target with your lead foot, push off your back leg, and throw the ball using your entire body.
I use the following throwing drill as a great way to get players' squared up. By stepping behind, the player naturally squares up to where they are throwing the ball. Even though this video is directed at pitchers, it's valuable for all youth players.
Rotation
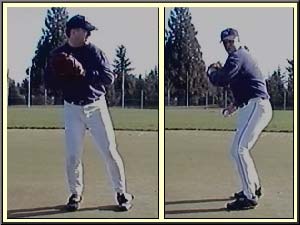
In order to throw the ball so it won't tail, you want to make sure you throw it across all four seems with '12-6' rotation. '12-6' rotation refers to a clock. If the ball rotates from 12, straight down to where 6 would be on the clock, this would be considered '12-6' rotation. The next two images show an example of 12-6 rotation.
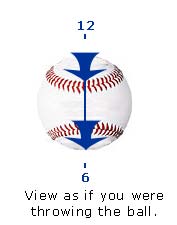
Unless you throw the ball straight over your head, you won't be able to get '12-6' rotation without moving your wrist. As the ball comes forward during your motion, you will want twist your wrist to keep your hand as vertical as possible. This is the key to having good '12-6' rotation on the ball.
Istructional Video on Infield Throwing from NAYS (National Alliance of Youth Sports)

Most Recent Blog Posts
Working With Players on Focusing on the Correct Part of the Baseball when Hitting (October 15 2016)
Getting More Accurate Throws From Your Team (April 5 2016)


Youth Coaching Advice
Young players will not be able to grip the ball across the seams while playing in the field. Work with your pitchers on getting the correct grip but have your other players work on other parts of their throwing mechanics. They can work on this skill when they get older. Do work with them on getting the ball out on the fingertips. This can be difficult with small hands, but it is still an important concept for them to understand.
Just wanted to say Thank you for the great website. Great information for this new coach. It sounds like baseball gave a lot to your life, so thanks for giving back to baseball.
- Ray K.